Have you always cherished a desire to make stained glass? This article will help you with some easy steps to make it at home.
The practice of making stained glass has been around for quite a long time. Stained glass windows and churches seem to go hand-in-hand, and you will find some of the earliest samples of stained glass artwork in churches on the European continent. Nowadays, stained glass is not confined to only churches and other such religious places; you can also see this art in homes, offices, hotels, restaurants, hospitals, and so on.
We now have stained glass installed in windows, doors, ceilings, room-dividers, mirrors, lampshades, sun-catchers, gift boxes, and many other items. When used properly, stained glass artifacts can transform the look of a place from commonplace to something quite extraordinary.
If you love stained glass objects, you could have a go at making them yourself. The craft of stained glass is not difficult to learn, as long as you follow the instructions, take all proper precautions, and put in enough practice.
Tools Required
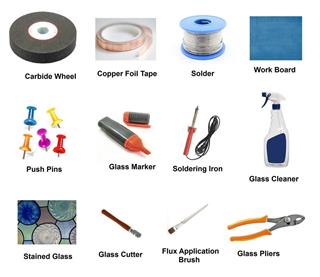
Once you’ve decided you are going to take up stained glass making, you might as well buy the best tools in the market. They may be a tad expensive, but will give you good value for your money in the long run. Here are some of the tools you will need:
- Glass Cutter – get a self-lubricating one with a tungsten
- Carbide wheel
- Glass Pliers
- Glass grinder
- Glass marker
- Soldering Iron
- Lathekin
- Work Board
- Push Pins
You will also need to buy a copper foil tape, flux, solder, flux application brushes, stained glass, glass cleaner, and patina.
Types of Glass
You can choose from a vast range of colored and textured glasses. The 3 main categories of stained glass are:
- Cathedral glass
- Opalescent glass
- Full or Sheet Antique glass
Some varieties of stained glass can be quite expensive, so you might want to start with ordinary glasses until you’re surer about your glass-cutting or scoring skills.
Safety Factors
When you’re working with glass and chemicals, it is only sensible to take all possible precautions. A little care and attention will prevent accidents and you can have an enjoyable crafting experience. So, firstly, get a studio or set aside a room in your home for your work. Make sure it is not easily accessible to children or pets, not when you are working and especially when you’re not around. Invest in a lock for that purpose.
Get organized and stay organized. Keep all your tools, glasses, and chemicals in specific allotted places and return each article to its particular place after use. Never allow things to lie around. When working, always wear gloves to protect your hands and goggles or a protective face cover to protect your eyes. You don’t want to chance getting glass into your eyes. Always lift a glass sheet vertically holding the upper and lower edges. Never shift your hand along the edge unless you want to risk a cut or two. Don’t rush. Take your time. You will make fewer mistakes this way.
Steps to be Followed
- The first step is to select a glass and have all your tools ready at hand.
- Then choose a pattern, nothing too intricate if it is your first project. Make 2 tracings of the pattern and number each part of the pattern. Cut the pattern to make templates. Some people use glass pattern shears for the cutting as this leaves space for the foil and solder.
- Trace each pattern template along with its specific number on the glass with a glass marker.
- With the glass cutter, carefully cut or score along the inner side of the tracing line. Don’t rush, take your time. Make sure you’re cutting correctly, it is important to be accurate. Cut all the pieces of the pattern in this manner.
- After you have scored the glass, break the pieces carefully with your hands or with the help of glass pliers and arrange them together on your work board. Use push pins to make sure that the glass pieces don’t shift around.
- The glass pieces may not fit perfectly and you will have to grind the edges a bit to shape them. Compare the glass pieces with the pattern tracings and mark the edges that are outside the tracing lines. Mark these and grind outside the marker lines. Do this for every single piece until they all fit together perfectly.
- Foil each glass piece next along the edges. Smooth the foil tape with your fingers and then burnish with the lathekin. Once you have foiled all the pieces, assemble them together once more.
- Now brush flux over the foil seams. Hold the solder over the seams and melt it with the soldering iron. See that the melted solder covers the foil entirely. Solder all the seams this way. When you’re done, turn the soldered glass over and solder the other side as well.
- Clean the glass with a soft rag and glass cleaner.
- Rub patina over the soldering with a rag to give an antique effect.
These are just the very basic steps of stained glass making. With practice and more research in the subject, you can refine your skills and create some spectacular effects.


